What's Wrong With Your Mix? The Data Behind Independent Music Production

Most independent mixes have the same problems. RoEx analysed over 200,000 tracks submitted to Mix Check Studio and presented the findings at the Audio Engineering Society Convention at the Javits Centre, New York. The data is specific - and the fixes are more straightforward than most producers expect.
Here's the link to the original research paper:
📝 Exploring trends in audio mixes and masters: Insights from a dataset analysis
Background: The Research Behind the Insights
The recommendations provided in this article are based on an in-depth analysis of over 200,000 audio tracks submitted to RoEx’s Mix Check Studio platform by musicians and producers. This platform, designed primarily for educational purposes, analyses user-uploaded tracks and provides actionable feedback aimed at improving the quality of both mixes and masters. The tracks that we analysed spanned 30 different genres, including: Electronic (15.7%), Hip Hop/Grime (14.5%), Rock (9.6%), Pop (9.6%) and House (7.0%).
The findings from this research were detailed in a peer-reviewed paper presented at the AES 157th Convention, offering a data-driven perspective on the common issues faced by music producers. Understanding these challenges is crucial for anyone looking to achieve a polished, professional sound. Below, we dive into these key areas and provide practical advice on how musicians and producers can address them effectively.
For a brief recap on why mixing and mastering are crucial steps in the music production process, you can check out our explainer videos on YouTube:
Key Challenges in Audio Mixing and Mastering
In our comprehensive analysis of mixes and masters, we identified several recurring issues that significantly impacted the quality of audio production. Our data showed that most music uploaded to Mix Check Studio wasn’t ‘ready’ to be released. The majority of mixes and masters had aspects that could be addressed to improve the listening experience — making tracks more sonically impactful and consistent.
The most prevalent issues in mixes included undercompression, stereo field problems, and excessive loudness, all of which can lead to a dull, unbalanced, or overly aggressive sound. Similarly, masters frequently exhibited excessive loudness, clipping, and overcompression, which can degrade the final output’s clarity and dynamic range.

Understanding and addressing these challenges is crucial for producing professional-quality tracks that stand out and make a lasting impression on your audience. Below, we explore how these challenges affect your music and provide actionable insights to help you achieve better results in your mixes and masters.
Dynamic Range and Compression
Dynamic range refers to the difference between the quietest and loudest parts of your track, and compression is the tool used to manage this range. Properly applied, compression can make the quiet parts of your track louder and the loud parts quieter, creating a more consistent and polished sound. However, the application of compression needs to be carefully balanced to maintain the natural dynamics and expressiveness of the music.
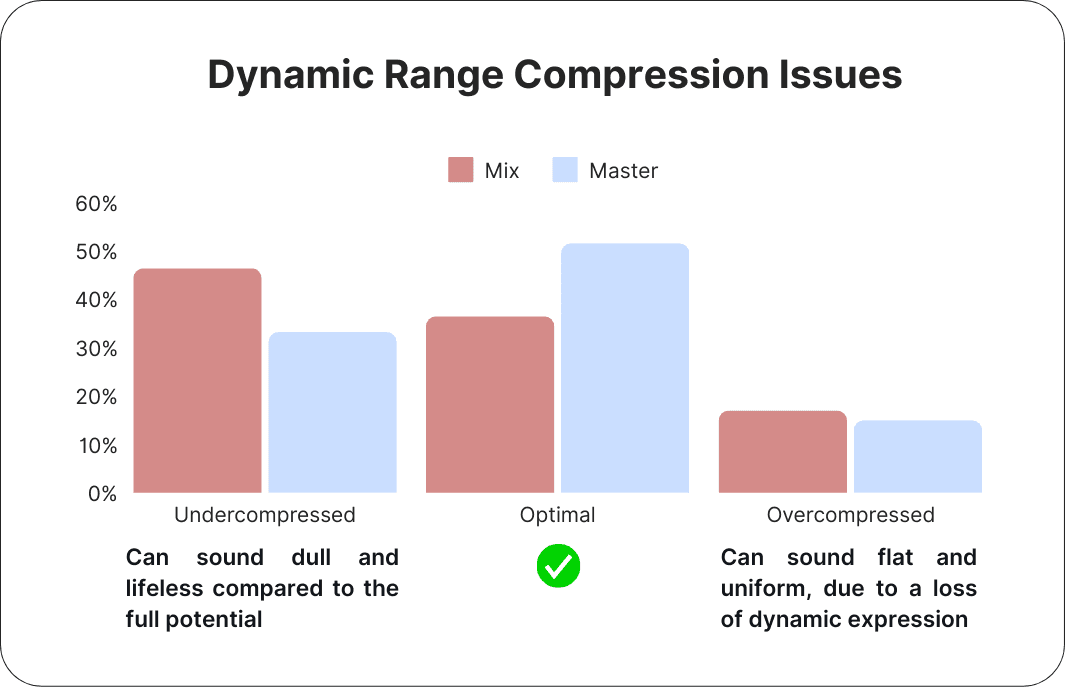
Our study found that 46% of mixes were under-compressed, which often made them sound dull and lifeless compared to their full potential. Under-compression occurs when insufficient compression is applied, allowing the dynamic range to remain too wide, which can result in a lack of cohesion and energy in the track. Without sufficient compression, a track can lack the punch and impact that makes it stand out, particularly when compared to well-produced tracks within the same genre.
On the other hand, 52% of mastered tracks in our analysis achieved the optimal level of compression, enhancing the dynamic balance without sacrificing the track’s natural feel. However, it’s important to note that over-compression — where too much compression is applied — can lead to a loss of dynamic expression, making a track sound flat and overly uniform. This trend is particularly genre-specific; for instance, electronic music often benefits from more aggressive compression to achieve a tight, punchy sound, whereas genres like folk or acoustic music require a lighter touch to preserve the subtleties of the performance.
Compression should be applied with care, beginning with gentle adjustments during mixing to maintain the track’s natural dynamics. Mastering can then be used to fine-tune the overall dynamic range, ensuring that the track achieves a balanced, professional sound. The appropriate level of compression varies by genre, and understanding these nuances is key to creating a mix that resonates with its intended audience.
Loudness
Loudness refers to the perceived volume of your track, encompassing both the individual levels of elements within the mix and how they blend to create a cohesive overall sound. Two key measurements are crucial in understanding loudness: integrated loudness, which measures the average loudness over the duration of a track, and true peak, which measures the maximum instantaneous level of a track. Loudness is often expressed in LUFS (Loudness Units Full Scale), a standardised unit that reflects how loud a track feels to the human ear, taking into account our sensitivity to different frequencies.
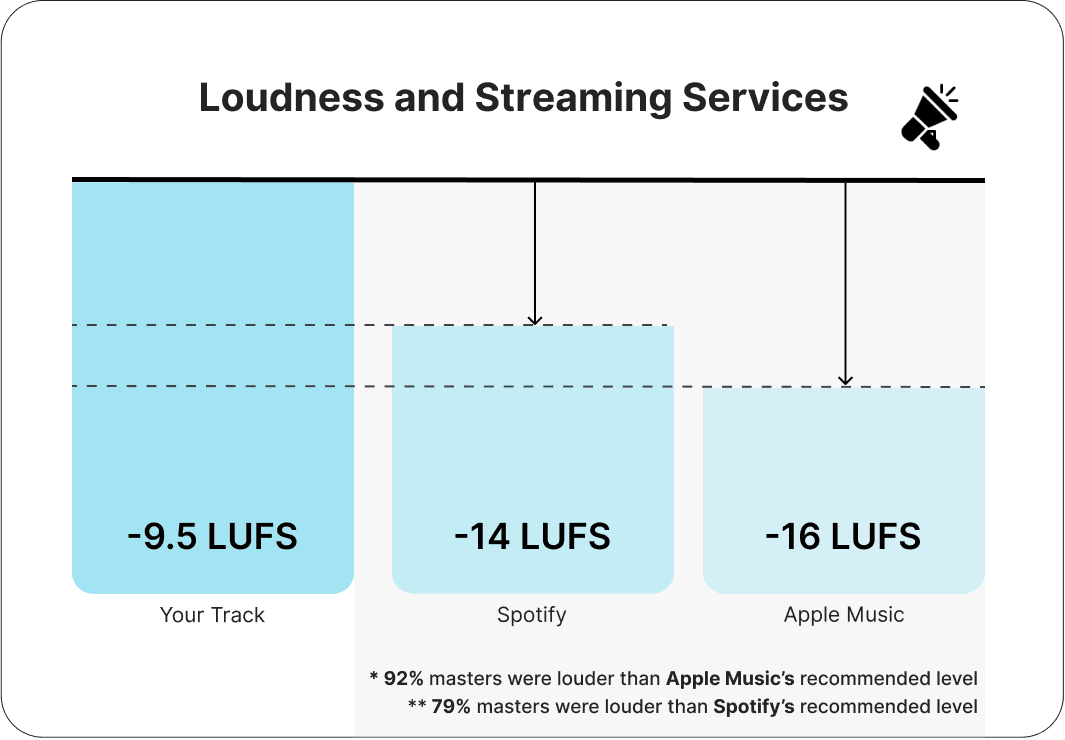
Our analysis through Mix Check Studio revealed that 79% of mastered tracks exceeded Spotify’s recommended loudness level of -14 LUFS, and 92% were louder than Apple Music’s recommendation of -16 LUFS. When tracks are too loud, streaming services automatically reduce their volume to meet these standards — a process known as “loudness normalisation.” This adjustment can alter the way your music sounds to listeners, potentially diminishing its impact.
To maintain the intended dynamic range and ensure your track sounds as it should across various platforms, it’s important to manage loudness carefully. For mixes, there’s an optimal range to aim for: a loudness level that’s not too high, ensuring the mastering process can effectively enhance dynamics without introducing increased noise. In our analysis, some mixes exceeded -17.5 LUFS, suggesting they might suffer from reduced dynamic range during mastering. Conversely, about 10% of mixes were quieter than -23 LUFS, indicating they could suffer from poor signal-to-noise ratios — meaning that when these quieter tracks are amplified during mastering, background noise could become more noticeable, negatively affecting the clarity and quality of the final product.
By aiming for loudness levels that align with platform standards — like Spotify’s -14 LUFS recommendation — you can help ensure your track plays back as intended, without unnecessary adjustments that could impact its overall sound quality.
Clipping
Clipping occurs when the audio signal exceeds the maximum level that a digital system can handle, which can lead leading to distortion. This distortion can make the sound harsh, unpleasant, and significantly compromise the clarity of your music. Our study revealed that clipping is a widespread issue, with 31% of mixes and 57% of mastered tracks exhibiting some form of clipping. This problem is particularly prevalent in electronic genres such as trap, house, and drum & bass, where the push for louder tracks often leads to excessive signal levels.
The phenomenon known as the “loudness wars” has contributed to the prevalence of clipping. In the quest to make tracks sound louder and more impactful, many producers and engineers push the limits of loudness, often at the expense of sound quality. This aggressive approach can result in clipping, especially during the mastering process, as tracks are amplified to compete with others. While minor clipping — brief and inaudible distortions — might not significantly affect the listening experience, major clipping, which is frequent and clearly audible, can seriously degrade the quality of your music.
To avoid clipping, it’s crucial to monitor true peak levels during mastering. True peak measures the highest point in the audio signal and should be kept below 0 dBTP (decibels True Peak) to prevent distortion. If major clipping is detected, you may need to reduce the overall loudness or adjust the dynamic range of your track to maintain clarity and prevent distortion. Addressing these issues ensures that your music retains its intended impact without the harshness and degradation that clipping can introduce.
Stereo Width
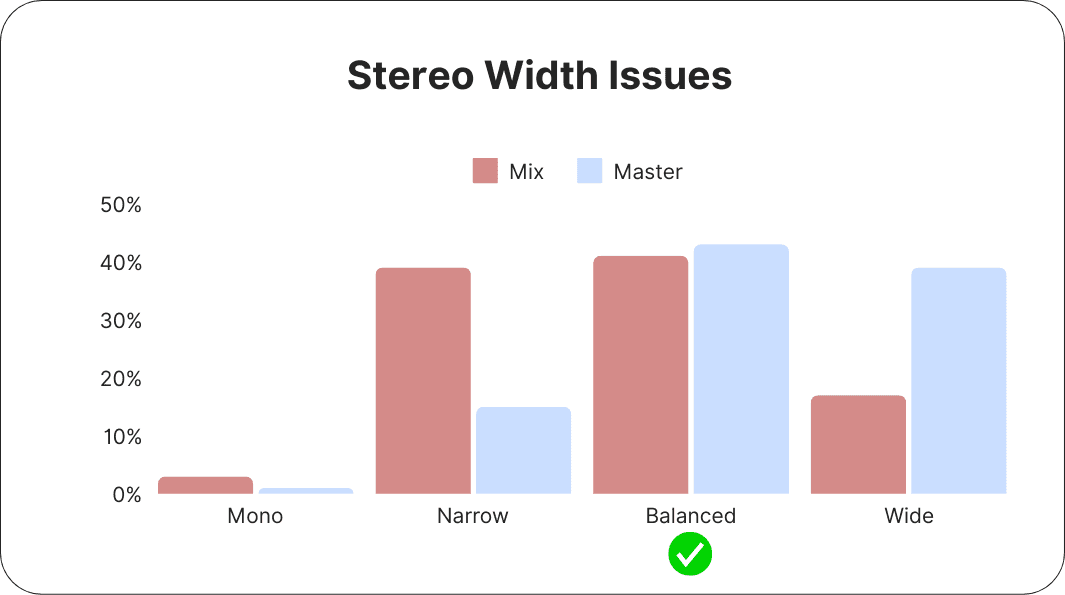
Stereo width adds a sense of space and depth to your mix, determining how different sounds are placed across the left and right channels. When used effectively, stereo width can make your mix sound expansive and immersive, giving each element its own space within the stereo field. However, it’s crucial to use stereo width effects judiciously. Overusing these effects can lead to an unbalanced mix or create issues when the track is played back in mono (more on this below). Retaining key elements, such as vocals or bass, in the centre of the stereo field can help maintain a strong, cohesive mix. Regularly checking your mix in mono is important to ensure that the stereo width enhances, rather than detracts from, the overall sound.
Phase Issues
Phase issues can arise when elements in your stereo mix are out of sync, which can lead to significant problems when your track is played in mono. These issues often cause parts of your mix to sound hollow, weak, or even disappear entirely in mono playback, undermining the effectiveness of your stereo width. Our study revealed that 16% of mixes and 15% of mastered tracks had phase issues, highlighting the importance of monitoring for this problem. Tools like correlation meters can help you detect phase issues by analysing the phase relationship between the left and right channels. By regularly using these tools and adjusting as needed, you can ensure that your track maintains its strength and balance in both stereo and mono formats, delivering a professional and impactful sound across all playback systems.
Mono Compatibility
Mono compatibility ensures that your stereo mix retains its impact when played back on mono systems, such as certain smartphones and portable speakers. Without proper mono compatibility, crucial parts of your track could become weak or even disappear entirely when played in mono. Our research highlighted that about 17% of mixes and 12% of mastered tracks struggled with mono compatibility, underscoring the importance of checking for this issue during the production process. Even after mastering, mono compatibility issues can persist, so it’s essential to regularly switch your mix to mono during production. This practice allows you to identify and fix any phase issues that might cause elements of your track to cancel each other out when played in mono, ensuring a balanced and powerful sound across all playback systems.
Tonal Balance
Tonal balance involves the distribution of energy across the different frequencies in your track — bass, mid, and high frequencies. A well-balanced mix ensures that no single frequency range is overpowering or lacking, resulting in a full and complete sound. Our analysis showed that certain genres tend to have specific tonal imbalances; for instance, electronic genres often feature exaggerated bass, while acoustic and folk tracks sometimes lack sufficient low-end presence. Achieving the right tonal balance is key to making your mix sound polished and professional, and can help convey the intended emotion. Using spectrum analysers can help you visualise the frequency content of your mix, ensuring that no frequency range is overly dominant or underrepresented. Additionally, listening to reference tracks from your genre can provide valuable guidance in achieving the ideal balance for your music.
How Can RoEx Help Me Reach Professional Grade Audio?
When mixing and mastering, a second pair of ears can help identify areas for improvement. Assistive technology like RoEx’s Mix Check Studio can help QA your work-in-progress audio and provide practical feedback. Mix Check Studio provides a comprehensive suite of tools that offer valuable insights into the most common audio issues for free, helping you refine your mixes and masters with confidence. The platform meticulously analyses your track for factors such as loudness, compression, phase coherence, stereo width, and tonal balance, providing detailed feedback that can guide your decision-making process. While Mix Check Studio offers powerful diagnostics, the final polish often requires hands-on adjustments in your Digital Audio Workstation (DAW such as Ableton Live, Logic Pro, FL Studio). By streamlining the identification of key audio challenges, Mix Check Studio simplifies the process of achieving a professional-quality mix, allowing you to focus more on the creative aspects of your music.
Uploading your work-in-progress mix or master to Mix Check Studio will provide feedback tailored to our analysis of your track. Here is a deeper dive into some key areas of production where Mix Check Studio can assist:
Loudness Issues
If your track is too loud or too quiet, Mix Check Studio will flag this and suggest the necessary adjustments. Addressing loudness issues effectively requires careful attention during both the mixing and mastering stages. Some of these suggestions could be as follows…
For Mixing:
1. Adjust Track Levels: Ensure each track in your mix is at an appropriate level while maintaining overall balance. Aim for a peak level around -6 to -3 dBFS on the master channel to provide sufficient headroom for mastering, preventing excessive loudness that could limit further adjustments.
2. Proper Gain Staging: Maintain proper gain staging throughout your signal chain. Adjust the input gain of individual tracks and plugins to prevent distortion and clipping while preserving sound integrity. In simple terms, this means controlling the volume of each track and plugin at every step to avoid unwanted distortion, ensuring the sound stays clean and balanced.
3. Compression for Dynamic Control: Use compression on individual tracks to control dynamic range and prevent excessive peaks. This helps create a consistent mix level and provides more headroom for mastering. Avoid over-compressing, which can result in a lifeless mix.
4. Limiters on the Master Channel: If you’ve applied limiting during mixing, consider reducing or removing it to create more headroom. It’s often best to leave final limiting to the mastering stage.
For Mastering:
1. Using a Loudness Meter: A loudness meter is essential during mastering, allowing you to measure perceived loudness in a standardized way and ensure levels meet platform-specific targets. Ideally, for streaming platforms, you should aim for an integrated loudness of around -14 LUFS (Loudness Units Full Scale), but this can vary slightly depending on the platform. This ensures your track is neither too loud nor too quiet, maintaining consistency across different playback systems.
2. Limiting and Input Levels: Use limiting carefully. Set input levels so the loudest parts of the mix just touch the limiter’s threshold, and adjust the output ceiling slightly below 0 dBFS to prevent distortion.
3. Final Mix Levels: Ensure your mix is neither too loud nor too quiet before mastering to avoid compromising sound quality. Provide sufficient headroom for the mastering engineer to work effectively.
By following these steps during both the mixing and mastering processes, you can achieve the desired loudness while maintaining the quality and integrity of your track.
Compression and Dynamic Range
Mix Check Studio can identify whether your track is over or under-compressed. The tool recommends adjustments to achieve the perfect dynamic balance without sacrificing the natural feel of your track. Some of these suggestions might be as follows:
For Mastering:
1. Be Mindful of Compression: Apply compression with care, generally aiming for a gain reduction of 1 to 2 dB. Experiment with the threshold, ratio, attack, and release settings to find the right balance between loudness and dynamic range.
2. Ensure Proper Compression During Mixing: Avoid over-compressing during mixing, as it leaves little room for adjustment during mastering. Preserve adequate dynamic range to give your mastering engineer room to enhance the track.
3. Experiment with Multiband Compression: Multiband compression allows targeted control over specific frequency bands, helping achieve a balanced sound while retaining the track’s natural dynamics.
4. Try Mid-Side Compression: This technique offers precise control over the “mono” (Mid) and “stereo” (Side) elements of your track, enhancing depth and clarity while maintaining phase integrity.
5. Consider Parallel Compression: Blend a heavily compressed signal with the original uncompressed signal to retain dynamic range while adding punch, especially useful for fixing under-compression.
6. Master Bus Compression: Use a master bus compressor to balance dynamics across the mix, evening out volume differences between sections and creating a cohesive sound.
For Mixing:
1. Tame Individual Instruments: Use compression to manage the dynamics of individual instruments with peaks or inconsistencies, maintaining a natural sound.
2. Proper Gain Staging: Maintain proper gain staging throughout the mixing process to prevent cumulative compression issues.
3. Use Compression Selectively: Not every track requires compression. Apply it only where needed to correct dynamics or add punch.
4. Experiment with Settings: Use slower attack times, smaller ratios, and careful threshold adjustments to allow tracks to “breathe” and retain their natural dynamics.
5. Use Multiband Compression: Target specific frequency ranges in your tracks to address under-compression, creating a balanced and consistent sound.
6. Remove or Reduce Limiting During Mixing: If limiting was applied during mixing, consider reducing or removing it to leave more headroom for mastering.
By managing compression and dynamic range effectively during both mixing and mastering, you can achieve a balanced, polished sound.
Clipping Prevention and Management
Mix Check Studio identifies and helps address clipping, which occurs when the audio signal exceeds the digital system’s maximum level, leading to distortion.
1. Proper Gain Staging: Check and adjust the levels of individual tracks to ensure adequate headroom, with peaks around -6 to -10 dBFS to prevent clipping.
2. Dynamic Range Control: Apply compression to control dynamic range, taming transients and maintaining a consistent level to prevent clipping.
3. Master Channel Limiting: Use a limiter on the master channel to catch rogue peaks. Set the threshold just below 0 dBFS and the output ceiling around -0.1 to -0.3 dBFS to avoid clipping.
4. Volume Automation: Use automation to reduce levels during peak moments, maintaining balance while avoiding clipping.
5. Transient Shaping: Use transient shapers to control sharp peaks in percussive elements, reducing the risk of clipping.
6. Saturation and Clipping Plugins: For controlled distortion without clipping, use saturation or clipping plugins sparingly to add harmonic content and warmth.
7. Group Processing: Process similar tracks together using bus compression or limiting to control overall levels and prevent clipping while preserving dynamics.
8. Mono-Compatible Effects: Use stereo widening effects carefully, as they can sometimes contribute to clipping. Monitor phase and mono compatibility to avoid issues.
By applying Mix Check Studio’s feedback and these techniques, you can manage clipping effectively, ensuring your music maintains clarity and impact.
Phase and Mono Compatibility
Maintaining mono compatibility is crucial to ensuring your mix sounds clear and impactful across all playback systems. Mix Check Studio identifies phase issues that may compromise your stereo image when played in mono and provides recommendations for addressing them:
1. Choosing Mono-Compatible Effects: Opt for mono-compatible effects or use mono versions of effects like reverb, chorus, and delay to maintain a consistent stereo image.
2. Using a Phase Correlation Meter: Use a phase correlation meter to identify phase issues. Correct phase problems by flipping the polarity of one channel or nudging tracks in time.
3. Mid/Side Processing: Balance mid (mono) and side (stereo) elements using mid/side EQ to remove problematic frequencies in the side channel that might cause phase issues.
4. Managing Stereo Widening Effects: Apply stereo widening effects cautiously, and always use a phase analysis tool to monitor phase coherence. Reduce width on problematic tracks if necessary.
5. Regular Mono Compatibility Checks: Regularly sum your mix to mono to identify phase problems or elements that disappear. Adjust levels, panning, and processing as needed.
6. Thoughtful Panning: Avoid hard-panning elements to prevent issues when the mix is summed to mono. Pan elements to retain clarity when collapsed to mono.
7. Track-Specific Processing: Focus on individual tracks for stereo processing, using EQ, compression, and other techniques to address phase issues without affecting the entire mix.
8. Phase Analysis Tools: Use phase analysis tools during mixing to visualize phase relationships, especially in complex mixes. Regularly check your mix in mono to catch phase issues.
By managing phase and mono compatibility carefully, you can ensure your mix translates well across all playback systems.
Stereo Width and Imaging
Stereo width adds depth and space to your mix, and Mix Check Studio helps you optimize this aspect by analyzing your stereo image for any issues.
1. Panning for Balance: Use panning to distribute instruments across the stereo field, avoiding hard-panning to prevent a “hole” in the center of your mix. Retain key elements, like vocals and bass, in the center for balance.
2. Mindful Use of Stereo Enhancers: Stereo enhancers can widen your mix but should be used carefully. Avoid overdoing it, which can lead to a “hollow” sound or cause instruments to be lost in mono playback.
3. Checking Mono Compatibility: Regularly check your mix in mono, especially when using stereo enhancers or wide panning. Ensure all elements remain clear in mono playback to prevent phase issues.
4. Mid/Side Processing: Use mid/side processing to adjust the stereo width with precision, enhancing or reducing specific frequencies in the side channels without affecting the central elements.
5. The Haas Effect for Stereo Imaging: Use the Haas effect to widen the stereo image by duplicating and delaying tracks. Be cautious not to overdo it, as excessive delay can create unwanted echo effects.
6. Layering and Doubling: Enhance stereo width by layering and doubling tracks, panning them to opposite sides for added depth and dimension.
By following Mix Check Studio’s feedback and these best practices, you can optimise the stereo width of your tracks, creating a balanced, spacious, and professional mix.
Tonal Balance and EQ
Tonal balance is key to creating a full, cohesive mix. Mix Check Studio analyses your track’s tonal balance and provides feedback for refining your EQ decisions.
1. Using Different Types of EQ:
• Parametric EQ: Offers precise control over individual frequencies, ideal for addressing specific issues like muddiness or harshness.
• Graphic EQ: Useful for broad tonal adjustments across multiple bands, providing a visual approach to shaping the mix.
• Dynamic EQ: Combines EQ and compression to manage problem frequencies that spike at certain volumes.
2. Addressing Specific Tonal Issues:
• Excessive Bass: Use a high-pass or low-shelf filter to reduce unwanted low-end rumble or overall bass levels.
• Weak Mids: Boost midrange frequencies with parametric EQ to add warmth and presence, especially between 500 Hz and 2 kHz.
• Harsh Highs: Tame overly bright highs with a low-pass filter or notch filter to reduce listener fatigue.
3. Importance of Reference Tracks: Compare your mix to reference tracks that are well-balanced across various systems.
4. Consider Room Acoustics: Room acoustics can affect your perception of tonal balance.
5. Enhancing Tonal Balance Throughout the Mix: Use bus EQ on instrument groups to shape their collective tonal balance, ensuring a cohesive mix.
6. Automation and Dynamic EQ for Evolving Tonal Balance: Adjust tonal balance dynamically throughout the track using automation or dynamic EQ to adapt to different sections of the song.
By using Mix Check Studio’s feedback and these EQ techniques, you can achieve a polished, full, and professional sound.
Automix: An Evolution in Mixing and Mastering
At RoEx, we have taken these findings to heart in the continuous development and refinement of Automix. Built on the same research presented at the AES Convention, Automix is our AI-driven platform for multitrack mixing and mastering - designed specifically to address the most common challenges producers face, including loudness, compression and tonal balance.
Upload your stems and get a professional mix and master in minutes. With an Automix Pro subscription you can mix and master unlimited tracks, download processed stems, and export the full session to Ableton Live, Bitwig Studio or Fender Studio to make final creative adjustments in your DAW.
Mix Check Studio is free with no account required. Upload your track, get an instant analysis of the issues identified in this research - loudness, clipping, phase, mono compatibility and tonal balance - and fix them with Mastering+, available on both mixes and masters with a free preview before you pay.
Learn